

In the arena of software development, confirming consistent user experiences across multiple gadgets and platforms is vital. Visual regression testing, often called automated UI testing has emerged as an essential procedure for validating UI consistency and identifying unintended visual changes in web apps. By automating the comparison of screenshots between different versions of an application, teams can identify and rectify visual discrepancies efficiently. Cypress is an emerging test automation framework that enables teams to ship high-quality products faster.


Cypress utilizes a modern architectural approach and is fully equipped with built-in screenshot functionality and also video recording capabilities, making it one of the best test automation frameworks for Cypress visual regression testing.
For those Automation Engineers validating a UI or performing an HTML canvas test, the UI look and feel of the application is vital for our end-users. Companies spend a lot on strategies to acquire more customers through advertisements, campaigns, and more. A missing visual error in production can jeopardize their reputation. My recommendation is to start learning some Visual Testing tools.
Visual Testing is about which parts of your UI are vital for testing (Visual Coverage). Perhaps visual or HTML canvas test is similar to functional test in that it’s designed to be an automated process that runs alongside code reviews. However, unlike functional testing, the HTML canvas test outputs can’t be considered as Passed or Failed.
Understanding Visual Regression Testing
Before talking about visual regression testing, we need to understand the current state of visual testing. Functional test scripts can validate the size, position, and color scheme of visual elements.
Visual regression testing is a critical aspect of software testing that focuses on identifying visual differences or regressions between different versions of a web application’s user interface (UI). Unlike functional testing, which primarily validates the behavior and functionality of an application, visual regression testing specifically targets the appearance and layout of UI elements.
While functional test scripts can indeed validate aspects such as the size, position, and color scheme of visual elements, they may not be sufficient to catch subtle visual changes that can occur during the development lifecycle. Visual regression testing aims to fill this gap by automating the comparison of screenshots or snapshots taken from different versions of the UI.
By incorporating visual regression testing into the testing process, teams can ensure UI consistency and integrity across various browsers, devices, and resolutions. This proactive approach not only helps prevent UI regressions but also enhances the overall user experience by maintaining a polished and cohesive visual appearance.


Which tools can be used to implement Visual Regression Testing in Cypress?
Visual Regression Testing in Cypress can be executed using several tools and plugins that improve the Cypress’ test capabilities particularly for visual consistency validation. Let’s check some of the plugins and tools that can be used for executing Visual Regression Test in Cypress:
- cypress-plugin-snapshots:, This is a well-known plugin enables you to take snapshots of components or complete pages and contrast them for visual regression.
- cypress-image-snapshot: Similar to cypress-plugin-snapshot that allows you to capture screenshots during test implementation and relate them against baseline images to spot any visual variances.
- Applitools Eyes Cypress SDK: It is an AI-centric visual test tool that proffers a Cypress SDK for visual regression test. It identify and highlights visual differences automatically in your app, giving complete reports.
- BackstopJS: Even though it is not a Cypress plugin, it is a tool that can be incorporated with Cypress. BackdropJS captures screenshots of website pages and runs image comparisons to detect visual discrepancies.
Such plugins and tools could be easily combined with Cypress to execute robust Visual Regression Test workflows, guaranteeing the visual quality and consistency of your web apps across diverse environs and browser configurations.
How do you set up Visual Regression Test in Cypress?
In this cypress tutorial for cross browser testing with Cypress, we discussed the difference between snapshot testing and visual regression testing; typically, we can find some plugins in Cypress to compare images and follow the same process of performing snapshot testing; for example, we can use the cypress-plugin-snapshots. To set up Visual Regression Testing in Cypress for UI validation, you can follow these steps:
- Install Cypress: Commence by installing Cypress in the particular project. If you have not installed npm (Node Package Manager) and Node.js yet, do that initially. Then, navigate to the project directory and execute the command to install Cypress.
- Install Visual Regression Plugin: Choose a visual regression testing plugin for Cypress. One popular option is cypress-image-snapshot.
- Configure Cypress for Testing: In your Cypress configuration file (cypress.json), you need to configure the plugin and set the selections for visual regression testing. Modify the configuration settings based on the specific requirements, like file paths, viewport dimensions, and base URL.
- Add Commands to Support File: Create a support file (cypress/support/index.js) if you don’t have one already. In this file, add the commands needed for visual regression testing using the installed plugin. For cypress-image-snapshot, you can add the following commands:
javascriptCopy code
// cypress/support/index.js import { addMatchImageSnapshotCommand } from ‘cypress-image-snapshot/command’; addMatchImageSnapshotCommand({ failureThreshold: 0.03, // Adjust threshold as needed failureThresholdType: ‘percent’, customDiffConfig: { threshold: 0.1 }, // Custom diff settings capture: ‘viewport’, // Capture the entire viewport });
- Write Visual Regression Tests: Create Cypress test files (cypress/integration) to write your visual regression tests.
- Run Visual Regression Tests: Start the Cypress Test Runner using the command:
bashCopy code
npx cypress open
Select the visual regression test file (visual_regression.spec.js) in the Cypress Test Runner and run the tests. The plugin will capture screenshots and compare them with the baseline images to validate the UI.
- Review Test Results: After running the tests, review the test results and visual regression reports generated by Cypress. Investigate any visual differences detected during testing and update the baseline images as needed.
By following these steps, you can set up Visual Regression Testing in Cypress for UI validation and ensure the visual consistency of your web applications. Adjust the configurations and test cases according to your project’s requirements and specifications.
How to use Visual Regression Plugin on Cypress Cloud Grid
We can use a Cloud Cypress Grid like LambdaTest, which provides automated cross browser testing on 40+ browsers and operating systems, and parallel testing to expedite the test execution in a scalable way. In addition, it will help improve our overall visual test coverage by resulting in better visual standpoint product quality as we can cover different combinations using the same test scripts. Other than that, LambdaTest also offers visual regression testing with Selenium.
Starting your journey with Cypress Parallel Testing? Check out how you can test your Cypress test scripts on LambdaTest’s online cloud.
Now execute test scripts faster than any other automation testing grid on LambdaTest’s Automated UI testing cloud.
To get started, you have to install LambdaTest Cypress CLI on your machine. Trigger the following command to install the same:
npm install -g lambdatest-cypress-cli
After installation is completed, set up the configuration using the below command:
lambdatest-cypress init
Once the command is completed, lambdatest-config.json is created in the project folder. Next, enter the LambdaTest credentials from the LambdaTest Profile Section.
“lambdatest_auth”: {
“username”: “”,
“access_key”: “”
Here is how you can configure the required browser & OS combinations in lambdatest-config.json:
{
“lambdatest_auth”: {
“username”: “”,
“access_key”: “”
},
“browsers”: [
{
“browser”: “MicrosoftEdge”,
“platform”: “Windows 10”,
“versions”: [
“latest”
]
},
{
“browser”: “Chrome”,
“platform”: “Windows 10”,
“versions”: [
“latest”
]
},
{
“browser”: “Firefox”,
“platform”: “macOS Big Sur”,
“versions”: [
“latest”
]
},
{
“browser”: “Firefox”,
“platform”: “Windows 10”,
“versions”: [
“latest”
]
}
],
The run_settings section in the JSON file contains the desired Cypress test suite capabilities, including Cypress_version, build_name, visual feedback settings, number of parallel sessions, etc.
“run_settings”: {
“Cypress_config_file”: “Cypress.json”,
“build_name”: “build-visual-testing”,
“parallels”: 5,
“specs”: “./Cypress/integration/e2e_tests/*.spec.js”,
“ignore_files”: “”,
“feature_file_suppport”: false
},
Tunnel_settings in the JSON file lets you connect your local system with LambdaTest servers via an SSH-based integration tunnel. Once this tunnel is established, you can test locally hosted pages on all the browsers currently supported by Cypress on LambdaTest.
“tunnel_settings”: {
“tunnel”: false,
“tunnelName”: null
}
Now that the setup is ready, it’s time to run the tests; remember that our run_settings file displays the parallels field as five once we trigger our execution in parallel without any extra parameter.
lambdatest-cypress run
Shown below is the test execution status from the LambdaTest Automation Dashboard.


Here is the execution snapshot, which denotes the progress of test execution:


In simple words, the significant benefit of Cypress visual regression testing on the cloud is achieving optimal visual test coverage without modifying the core logic of the test code to incorporate multiple OS and Browsers.


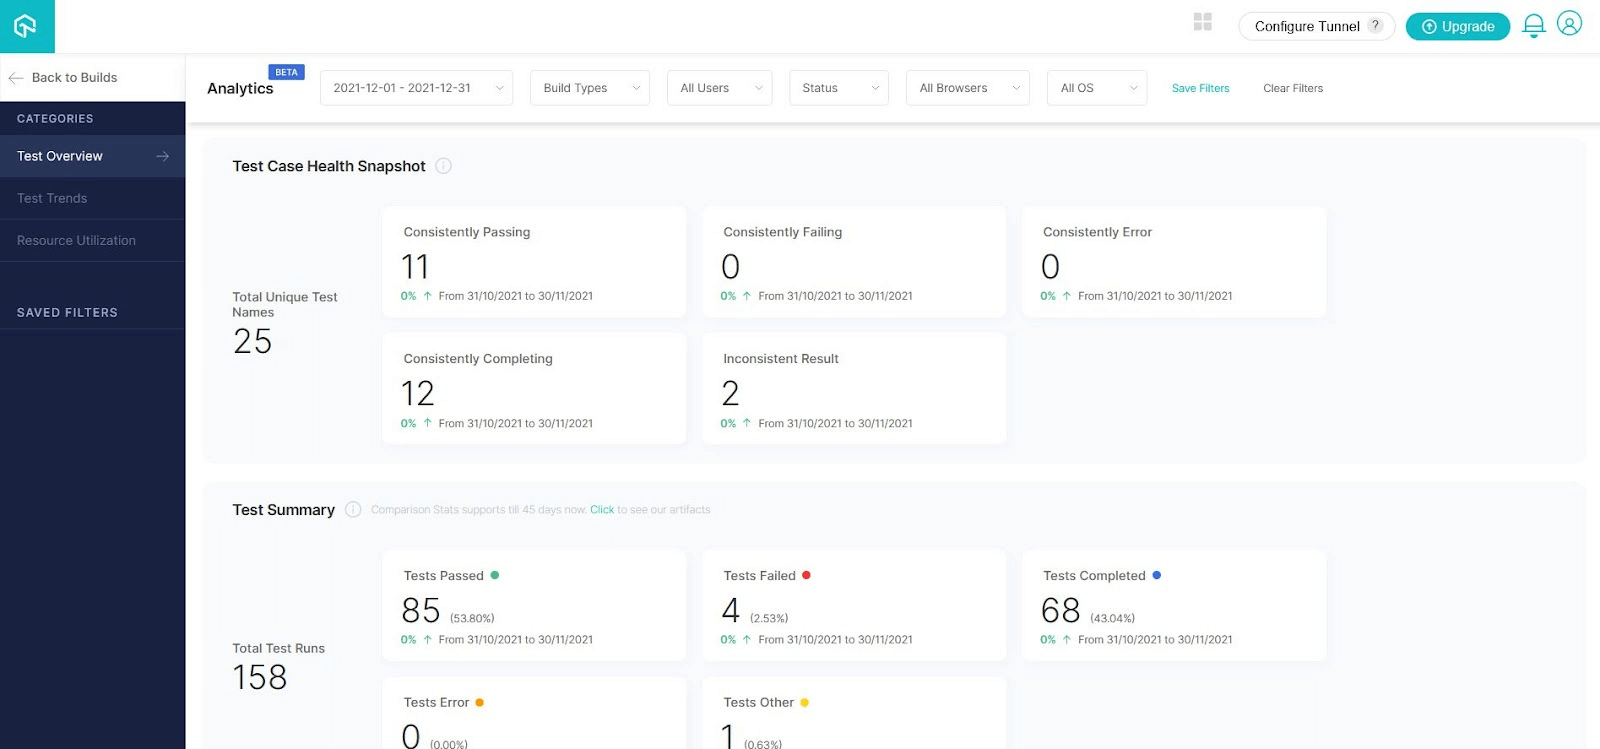
To view test performance metrics, navigate to the LambdaTest Analytics Dashboard. The Test Overview will provide a snapshot of tests consistent with stable behavior. Meanwhile, the Test Summary will display the total number of tests passed or failed, as well as any completed tests and pending tests.

You can also use Lambdatest to perform Cypress Visual Testing on the Cloud. Lambdatest compares screenshots pixel by pixel to detect visual bugs and provide a consistent user experience.
Final Verdict
Visual testing plays a crucial role in enhancing UI validation. Whether opting for open-source solutions or investing in paid tools, addressing visual inconsistencies is paramount to ensuring a seamless user experience. Leveraging Cypress Visual Regression Testing enables efficient, accurate, and thorough validation, making it an essential component for any organization striving for a strong online presence.
With Lambdatest, you can expedite automated visual testing, ensuring a bug-free delivery. Our automated visual testing allows you to compare screenshots swiftly, highlighting visual changes for error identification. Make use of this Screenshot Comparison Tool to deliver pixel-perfect sites & improve user experience.